As remote work and collaboration continue to gain momentum, the need for reliable and user-friendly remote desktop applications has become increasingly paramount. AnyDesk, a leading player in this space, offers a comprehensive solution that simplifies the process of accessing and controlling remote systems. This step-by-step guide will walk you through the process of downloading and installing AnyDesk, empowering you to leverage its powerful features and streamline your remote work experience.
Downloading AnyDesk
The first step in getting started with AnyDesk is to download the appropriate version for your operating system. AnyDesk offers cross-platform compatibility, supporting a wide range of platforms, including Windows, macOS, Linux, Android, and iOS.
- Visit the AnyDesk Website: Begin by navigating to the official AnyDesk website (anydesk.com) using your preferred web browser.
- Select Your Operating System: On the AnyDesk homepage, locate the section that allows you to download the software for your specific operating system. This is typically highlighted prominently on the website.
- Choose the Download Option: Depending on your needs, you can choose between the free personal version or the paid business version of AnyDesk. The free version offers a range of essential features, while the business version provides additional enterprise-level capabilities and support.
- Initiate the Download: Click on the appropriate download button for your operating system, and the AnyDesk installer file will begin downloading to your device.
- Save the Installer: Once the download is complete, save the installer file in a location on your device that you can easily access for the installation process.
Installing AnyDesk
With the AnyDesk installer file downloaded, you can now proceed to the installation process. The steps may vary slightly based on your operating system, but the general process is as follows:
- Launch the Installer: Locate the AnyDesk installer file you downloaded earlier and double-click or open it to initiate the installation process.
- Follow the On-Screen Instructions: The AnyDesk installer will guide you through the installation process. Typically, this involves accepting the license agreement, selecting the installation location, and choosing any additional options or features you want to include.
- Complete the Installation: Depending on your system configuration and the version of AnyDesk you are installing, the installation process may take a few minutes to complete. Once finished, the AnyDesk application will be installed on your device.
- Open AnyDesk: After the installation is complete, you can launch the AnyDesk application from the appropriate location on your device, such as the Start menu (Windows), Applications folder (macOS), or the application launcher (Linux).
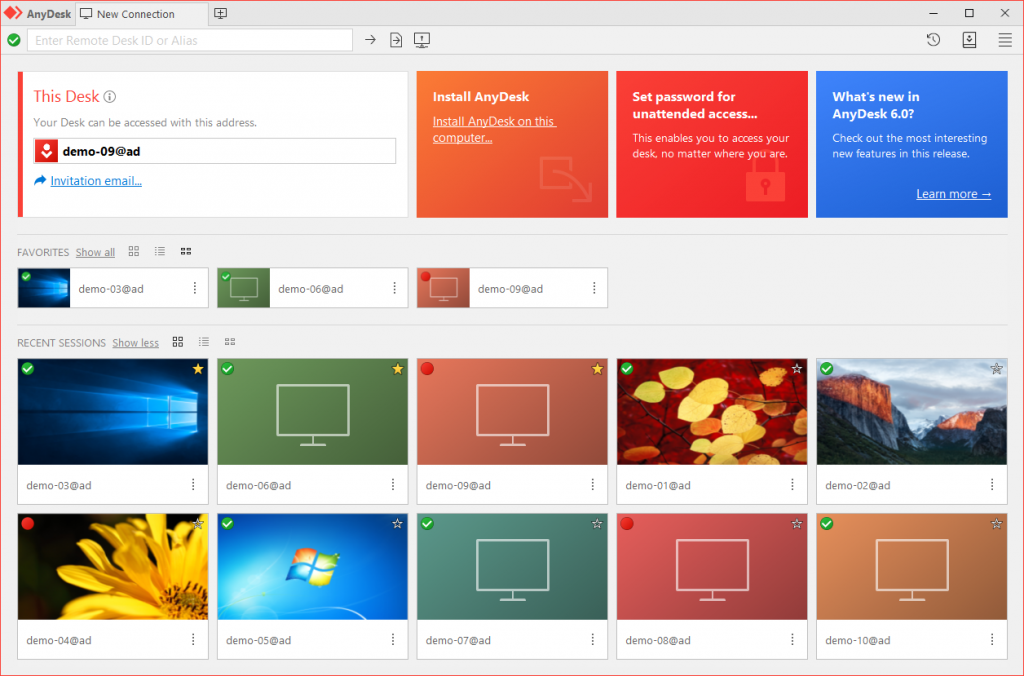
- Familiarize Yourself with the Interface: The AnyDesk interface is designed to be intuitive and user-friendly. Take a few moments to explore the various menus, tools, and settings available to ensure you are comfortable navigating the application.
Configuring AnyDesk
With AnyDesk installed, you can now proceed to configure the application to suit your specific needs and preferences.
- Set Your AnyDesk ID: When you first launch AnyDesk, you will be presented with your unique AnyDesk ID, which is a crucial piece of information for establishing remote connections. This ID can be customized to a more memorable and easily shareable format.
- Adjust Preferences: AnyDesk offers a range of preferences and settings that you can customize, such as the appearance, performance, security, and privacy options. Spend some time exploring these settings to optimize the application for your use case.
- Enable Two-Factor Authentication: To enhance the security of your AnyDesk account, consider enabling the two-factor authentication feature. This adds an extra layer of protection by requiring a secondary verification step during the login process.
- Manage Connections and Permissions: AnyDesk’s connection management and permission controls allow you to regulate who can access your remote systems and what actions they can perform. Familiarize yourself with these features to ensure the appropriate level of access and control.
- Integrate with Other Tools: Depending on your needs, you may want to explore AnyDesk’s integration capabilities with other applications or platforms, such as remote monitoring and management (RMM) tools, ticketing systems, or enterprise-wide collaboration platforms.
Connecting to Remote Devices
The primary function of AnyDesk is to enable remote access and control of other devices. Here’s how you can establish connections with remote systems:
- Obtain the Remote Device’s AnyDesk ID: To connect to a remote device, you will need the AnyDesk ID of the remote system. This ID can be obtained from the person who is hosting the remote system or by having them share it with you.
- Initiate the Connection: In the AnyDesk application, locate the option to connect to a remote device and enter the AnyDesk ID of the remote system. This will initiate the connection process.
- Authenticate the Connection: Depending on the security settings, you may be prompted to enter a password or complete a two-factor authentication step to authenticate the connection and gain access to the remote system.
- Establish Control: Once the connection is established, you will be able to view and interact with the remote system as if you were physically present, with the ability to control the mouse, keyboard, and other input devices.
- Collaborate and Troubleshoot: With the remote connection established, you can leverage AnyDesk’s collaboration features, such as file transfers, screen sharing, and remote support tools, to work seamlessly with the remote user or provide technical assistance.
Frequently Asked Questions (FAQs)
Q: Is AnyDesk free to use?
A: AnyDesk offers a free personal version that includes a range of essential features. There is also a paid business version that provides additional enterprise-level capabilities and support.
Q: Can I use AnyDesk on multiple devices?
A: Yes, AnyDesk supports cross-platform compatibility, allowing you to use the application on a variety of devices, including Windows, macOS, Linux, Android, and iOS.
Q: How secure is AnyDesk?
A: AnyDesk places a strong emphasis on security, with features like end-to-end encryption, two-factor authentication, and granular permissions and access controls to protect your data and remote connections.
Q: Can I record and review remote sessions with AnyDesk?
A: Yes, AnyDesk offers session recording and reporting capabilities, allowing you to document and review remote interactions for various purposes, such as training, troubleshooting, and compliance.
Q: How do I get support for AnyDesk?
A: AnyDesk provides a range of support resources, including a comprehensive knowledge base, user forums, and direct customer support for both the free and paid versions of the application.
By following this step-by-step guide, you can download, install, and configure AnyDesk to streamline your remote work and collaboration needs. Whether you are an individual user, a small business, or a large enterprise, AnyDesk’s powerful features, robust security, and user-friendly interface make it a versatile and reliable choice for seamless remote access and control.


